 |
Steve's Buggy Website
Story So Far - Page 2
What's happened to the body? - Here's what...
Whilst all the dismantling, cleaning, grinding, cutting and welding of the floorpan was taking place, the body was left sitting on the grass next to the garage with a tarpaulin over it.
|
Everything has been removed from the body (lights, bonnet, petrol tank, rear seats, etc). Hundreds of rusty nails, screws, P-clips and thousands of rivets have also been removed, all leaving gaping holes in the fibreglass. Unfortunately, the bullet-hole effect doesn't appeal to me, so all the small holes will have to be filled in with glassfibre bridging compound (Isopon P40).
At the back of the body, around the rear seat area are two large holes. When I bought the buggy, they were hidden by a single layer of fibreglass behind some plywood. These holes are big enough to put your fist through and will have to be repaired with proper fibreglass...Doh!
There is a fair bit of major fibreglass repair work needed to fix the body. There are the two jagged holes in the back, the two badly cut, oversized holes where the rear lights (which I am not going to use) used to go, another badly cut hole where the steering column goes and a whole variety of other smaller holes which I won't need. As I'm using a twin carb type 3 engine, I'll also be filling the hole where the air cleaner for a single carb engine goes.
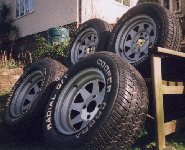 |
At the 'VW Indoor Fair' (Nov-98) or Slough Swapmeet as it's more commonly known, I just happened to notice some MASSIVE wheels. I wasn't particularly looking for replacement wheels at the time so I just walked on assuming that they would be much too expensive anyway. When the show was nearly over, I had another quick look around to see if there was anything worth buying. I noticed they were still there, again I just assumed that they must definitely be way too expensive for my pocket, but I was curious, so I asked anyway.
" 'xcuse me mate, how much for the wheels?"
"£150"
Now I don't know exactly what kind of money things like that go for, but £150 for a set of oversized wheels with good-as-new rubber sounds more than reasonable to me. The rear two are Wellers too. Anyway, after some convincing, my wallet - I mean Dad offered him £130 and after some considerable thought he accepted.
You have to understand that these wheels are really big. The rear ones are almost the size of Japan (27½x10½ inches) with the front ones being more like South Korea (24x7½ inches). Buying new wheels and tyres of this size would have cost a small fortune. Just replacing the knackered tyres on the boring wheels which came with the buggy would have still cost a fair bit. More than 130 quid anyway.
Anyway, now the wheels are stored away now ready for the day when they are fitted...Watch This Space...
The Perfect Buggy - 'Hot Lemon'
Picture this - It's a beautiful day at Stonor Park '98, the sun is shining (some of the time) and all is great. Whilst walking around looking at all the cars on show you see this...
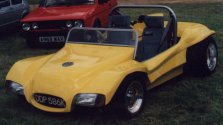 |
I don't know what you think (It's hard to judge from this picture) but I thought that this buggy had to be the best in the world - It's certainly the best I've ever seen. It's a masterpiece of engineering and craftsmanship. The build quality is superb and the fine detailing scattered around from place to place finishes the car off perfectly.
The thing which really got me about 'HOT LEMON' is the fact that I'm quite sure that it's the short wheel based version of my buggy - a Rat Mk1 - a great source of ideas for my own. Of course, I could only dream of making my buggy look this good. It has a huge Renault V6 engine in the back seat for starters. It also has dual exhausts which are so big you could easily mistake them for the entrance to euro-tunnel. You'll have to take my word for it, this buggy was incredible.
Here is a detailed account of what I have planned for my Buggy
Lights:- I may replace the rear lights (which are all cracked because they have been bent to shape) with - dare I say - Mk1 Ford Fiesta tail lights. I may however use lights off of an old Renault 5. A fellow rat owner has done this and they fit perfectly - except that the indicators end up on the inner sides. The more recent Mini rear-lights are also an option.
The stalk mounted headlights which were fixed to the top of the wings will probably be replaced by Mk3 Ford Fiesta headlights and indicator units. They will be fitted under the wing in those headlight shaped gaps providing they don't obstruct the front wheels, could be a problem. Before you start sending me hate (E-)mail for using Ford parts, let me explain. The reason I'm using Ford parts is that the scrap yards are absolutely smothered in Fords, especially Fiestas. So the parts should be cheap to replace if they are broken.
Body:- The rough side of the fibreglass will all be painted with black smootherite (or hammerite - smooth finish as it's now called) I am also wondering about the possibility of using a large sheet of sticky-back half-matt black plastic sheet (to smooth out the roughness) or maybe even using thin metal painted semi-matt black. The edge of the fibreglass will be bound with rubber edging stuff. As for colour, I would like to paint the body 'Baltic Blue' which is one of Seat's colours. If you aren't familiar with this colour, it's a slightly pale blue with a hint of purple in it - trust me - it looks nice.
I would like to lower the rear seat as the space for the gearbox is massively oversized (For U.S. customers who like to fit large gearboxes - or something). At the moment, the rear seat is way too high. It has been done by a fellow Rat owner, but it sounds tricky. I also intend to get rid of the Jaguar XJ6 petrol flap (Which looks absolutely shite and isn't even fitted properly) and put a marine inspection cap right in the middle of the bonnet with a fuel cap underneath. (Ooh, that's original - NOT)
Roll Bar(s):- As standard, the buggy only came with one central bar which stands completely upright and spoils the look of the buggy. I'd like to slant the central bar back and put two reinforcement bars leading to the rear wheel arches.
It seems that after talking to a fellow Rat Mk1 owner, a windscreen frame assembly is essential, or the windscreen will judder until it gets to a state where it snaps off and breaks your face. Since the windsreen frame is a little battered and has a few holes in, I'd like to make, or get made a 2 inch thick frame (same thickness as roll bar) which will house the windsreen. I here that some people use a side window from a camper as a windscreen which because of the seal, makes mounting it to a frame that much easier. However, I would like to use proper laminated windscreen glass rather than just toughned side glass.
There is a product made/sold by Bugpack called 'Chassis Windshield Rubber'. It takes the shape of a tubular frame (such as you get on frame buggies) and holds the glass firmly in a groove.
Floorpan and the likes:- Well, what is there to say, I've already got the massive wheels. Basically no major changes, just painted and looking good. A few flash items may be fitted at a later date.
Interior:- Interior-wise, I plan to get some cheap bucket seats, possibly second hand. and make up some back seats with a little bit of padding and some imitation leather. The floor may be covered with carpet but the sides will just be painted. If I use carpet, it will need to be removable in case the car gets wet. So I might use velcro or poppers to secure the carpet in place. I shall probably just make do with a nice set of floor mats. The main roll bar will be wrapped in pipe insulation foamy stuff with imitation leather held around with velcro or maybe a zip. (out comes the old sewing machine then - my mum that is). Seatbelts will appear in the form of front and hopefully rear also. For the rear, any old lap-belts will do. As for the front, I'm not sure whether to get some nice Sparco 3-point belts and put the trailing webbing between the legs of the back seat passengers, or just get some normal belts. I'm also wondering if maybe one day, some kind of neon lighting will creep its way in. I have found such a product made specially for use in cars and it is not that expensive.
Dashboard and all that stuff Hmmmmm. Interesting one this. What the hell do I do about the dash. The original dash was supplied with the buggy, but it was more holes than dash. I'm wondering whether a Wizard Roadster dashboard would be okay after a bit of adjustment and some minor fibreglass work. Making my own fibreglass dash would be a little too much effort, and dash transplants from other cars tend to look pants. I'm also wondering about something like a centre console, which I could mount a couple of dials in, possibly a stereo and some storage for putting all those coins, sweets and petrol receipts in. A centre console would also be a good place to hide the washer bottle behind and various other bits.
(Last updated Jul-99)